Enrico Scholz
Last modified: Wed Aug 20 00:48:40 CEST 2003

Files can be found here.
vserver ... buildbehavior on the host-machine:
$ wget http://www.tu-chemnitz.de/~ensc/fedora/vserver-0.23-0.fdr.5.src.rpm

$ rpmbuild --rebuild vserver-0.23-0.fdr.5.src.rpm

# rpm -Uvh /usr/src/redhat/RPMS/i386/vserver-0.23-0.fdr.5.i386.rpm
ftp-samplevserver by executing
# vserver ftp-sample build
vserver-tool of the original vserver-package, this command will not copy the host-system filetree into the vserver, but creates some directories and inodes only.
/etc/vserver/ftp-sample.conf to your needs and add the minitkeyword to the
S_FLAGS. A configfile can look like:
IPROOT=YOUR IP ADDRESS

IPROOTDEV=eth0

S_HOSTNAME=ftp-sample.YOUR DOMAIN

ONBOOT=yes

S_DOMAINNAME=

S_NICE=

S_FLAGS="lock nproc minit"

ULIMIT="-H -u 200"

S_CAPS=""

AUTO_SHUTDOWN=yes

RPM_IGNORE_DOC=

# RPM_INSTALL_OPTIONS="-o RPM::Install-Options::=--promoteepoch"
IPROOTand
S_HOSTNAME.
$ wget http://www.tu-chemnitz.de/~ensc/vserver/vrpm/vserver-rpm-0.10-1.src.rpm

$ rpmbuild --rebuild vserver-rpm-0.10-1.src.rpm

# rpm -Uvh /usr/src/redhat/RPMS/i386/vserver-rpm-0.10-1.i386.rpm
$ wget http://www.tu-chemnitz.de/~ensc/vserver/vapt-get

# install -p -m755 vapt-get /usr/local/sbin/
$ wget http://www.tu-chemnitz.de/~ensc/fedora/minit-0.9.1-0.fdr.2.src.rpm \

       http://www.tu-chemnitz.de/~ensc/fedora/minit-scripts-0.4-0.fdr.1.src.rpm \

       http://www.tu-chemnitz.de/~ensc/fedora/minit-setup-0.6-0.fdr.3.src.rpm \

       http://www.tu-chemnitz.de/~ensc/fedora/minit-tools-0.6-0.fdr.1.src.rpm

$ rpmbuild --rebuild minit-0.9.1-0.fdr.2.src.rpm minit-setup-0.6-0.fdr.3.src.rpm \

       minit-tools-0.6-0.fdr.1.src.rpm

# rpm -Uvh /usr/src/redhat/RPMS/i386/minit-tools-devel-0.6-0.fdr.1.i386.rpm

$ rpmbuild --rebuild minit-scripts-0.4-0.fdr.1.src.rpm
$ D=/var/data/apt-repo

$ mkdir -p $D/redhat/{base,RPMS.minit,SRPMS.minit} && cd $D/redhat

$ echo -e 'Archive: local\nComponent: minit\nVersion: 9' >base/release.minit

$ echo -e 'Origin: local\nLabel=minit repo\nArchitecture: i386' >>base/release.minit

$ cp -a /usr/src/redhat/RPMS/*/minit-* RPMS.minit

$ genbasedir --flat --bloat `pwd` minit
# D=/var/data/apt-repo

# vdir=/vservers/ftp-sample

# mkdir -p $vdir/etc/{rpm,apt} $vdir/var/cache/apt

# echo -e '%_install_langs C\n%_netsharedpath /dev' >$vdir/etc/rpm/macros

# cp -a /etc/apt/{sources,vendors}.list* $vdir/etc/apt

# rm -f $vdir/etc/apt/sources.list.d/macromedia.list

# echo "rpm  file:$D redhat minit" >>$vdir/etc/apt/sources.list"

# echo -e 'Essential:\n    vsftpd-minit' >$vdir/etc/apt/rpmpriorities

# perl -pi -e 's!(GPG-Check "true")!// \1!'  /etc/apt/apt.conf
# vapt-get ftp-sample -- update

# vapt-get ftp-sample -- install filesystem -y

# vapt-get ftp-sample -- install coreutils -y

# vapt-get ftp-sample -- dist-upgrade -y
installsteps are required because of packaging-bugs in some RHL9 packages (insufficient pre/post requirements).
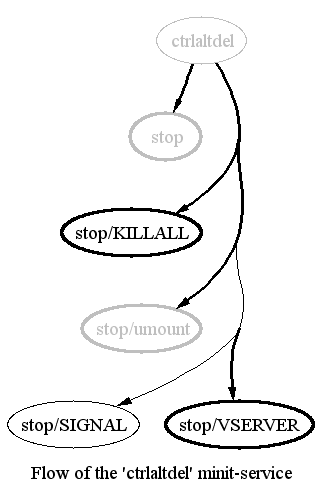
# vserver ftp-sample exec minit-svc add stop/VSERVER ctrlaltdel/
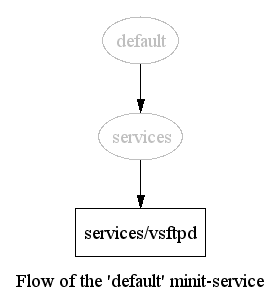
# vserver ftp-sample exec minit-svc add services/vsftpd services/
VSERVERstop-method as the last command for
ctrlaltdel/(shutdown), and the second one adds 'vsftpd' as a service which will be executed. There are existing graphical representations of the startup and shutdown flow also.
restart:
# vserver ftp-sample stop

# vserver ftp-sample start

# vserver ftp-sample restart
restartcommand should not take more than 7 seconds .
|
Enrico Scholz
Last modified: Wed Aug 20 00:48:40 CEST 2003
|
|